I am so grateful for Mark McAfee and the whole team at Organic Pastures for not backing down and, as he says in the video, coming back better and stronger, no matter what the regulatory agencies throw at them. Thank you, Mark, for defending my freedom to drink raw milk!
Saturday, June 9, 2012

My garden, 2012
I just wanted to show and tell about my garden. I am off to a late start, but fortunately the growing season in southern California is long and forgiving.
So that's my garden so far! In the fall, I planted a very small garden in my 8 buckets...I successfully grew a small crop of broccoli, a few carrots, and TONS of lettuces which kept growing and growing as I kept clipping and clipping. I basically have 5 times the garden space now that I did then, and the weather is more-so on my side (we'll see how everything does in the harsh summer, though). I do wish I had gotten some seedlings going indoors sooner, but I didn't have my garden boxes set up until about a month ago, and before that, I wasn't sure exactly what we were going to do. So this is basically a continuation of my first year gardening. It's been great learning what works and what doesn't. I am sure as I learn and as time goes on, I will get the hang of things.
Today I just started a few more seedlings indoors. Today at the farmer's market, I bought some beautiful purple bell peppers (apparently they do come in colors other than green, red, and orange/yellow!). I am going to see if I can get a couple of those seeds to grow...and then I bought a yellow cucumber that I am also going to try to sprout. I have some squash in the fridge and will see what I can do with those seeds, too. I love using "free" seeds from veggies I buy at the farmer's market!
If you are new to gardening, I highly recommend you pick up Mel's Square Foot Gardening book (which I linked to above). He makes it so accessible and simple. I really like the concept of the boxes. Lowe's sells his "Mel's mix" which consists of 1/3 peat moss, 1/3 vermiculite, and 1/3 compost blend. It's much easier than trying to piece together the ingredients and mix them up yourself (which is an option he describes at length in his book if you can't find the Mel's mix in stores). It cost us about $100 for all of the wood for the boxes and the soil. Since you are starting with brand new soil from scratch, there's no plowing, no fertilizing, no tilling, no digging, minimal weeding, no testing, etc. This is the part that really intimidated me as a new gardener, and using square foot gardening, I don't have to worry about any of it! Mel recommends you have up to two 4 x 4 boxes per adult - one for a daily salad during the growing season, and the other for "supper veggies" during the growing season and beyond for preserving. We currently have the equivalent of two 4 x 4 boxes with the four 2 x 4 boxes my husband built, which doesn't include the 8 buckets of tomatoes I have planned. So we currently have enough room to grow over half of our produce needs with this small little balcony garden. I have room for at least a couple more 2 x 4 boxes. We own our home and have 1/5 an acre of land; however, our backyard is a construction zone at the moment, and this balcony is very easy for me to get to which means I keep things watered and maintained a lot easier. Once our backyard is done, we can easily move these boxes back there if we want to...or maybe we will build more boxes for our backyard and have even more space to grow!!
So there you have it. I will certainly keep you posted as harvest time comes!
 | |||||
| This is the view as you step outside. My garden is right outside my living room on a balcony area above our garage. |
 |
| We set up garden boxes using the Square Foot Gardening method by Mel Bartholomew. Each square is approximately one square foot, and we planted one crop per square. Depending on the required spacing, you plant anywhere from 1 to 16 plants per square. My husband built the boxes with plywood bottoms on them so they can go anywhere and be moved later if we change our mind about where we want them. We need to work on getting a better drip system set up; for now I hand water what the drip misses. The crops I have going in this box are, from top left to top right, bottom left to bottom right: bush beans, bush beans, lettuce, lettuce, cilantro, cilantro, green onions, and radishes. I planted all of these crops directly in the soil less than two weeks ago and look at them grow! |
 |
| This is the next box over from the one above. The top row is all cantaloup. I bought a cantaloup at the farmer's market last weekend and put some of the seeds directly in the soil. So far, two have sprouted. They take up a lot of room and will need to be thinned later so I only have one plant per two boxes. Not sure how it's going to go, but it was a risk-free trial! The bottom right square is two cucumber plants which I started indoors and transplanted a few days ago. It seems to have been a traumatic ordeal for these poor 'cukes, but they are hanging on and seem to be generating some new growth. Praying they make it! |
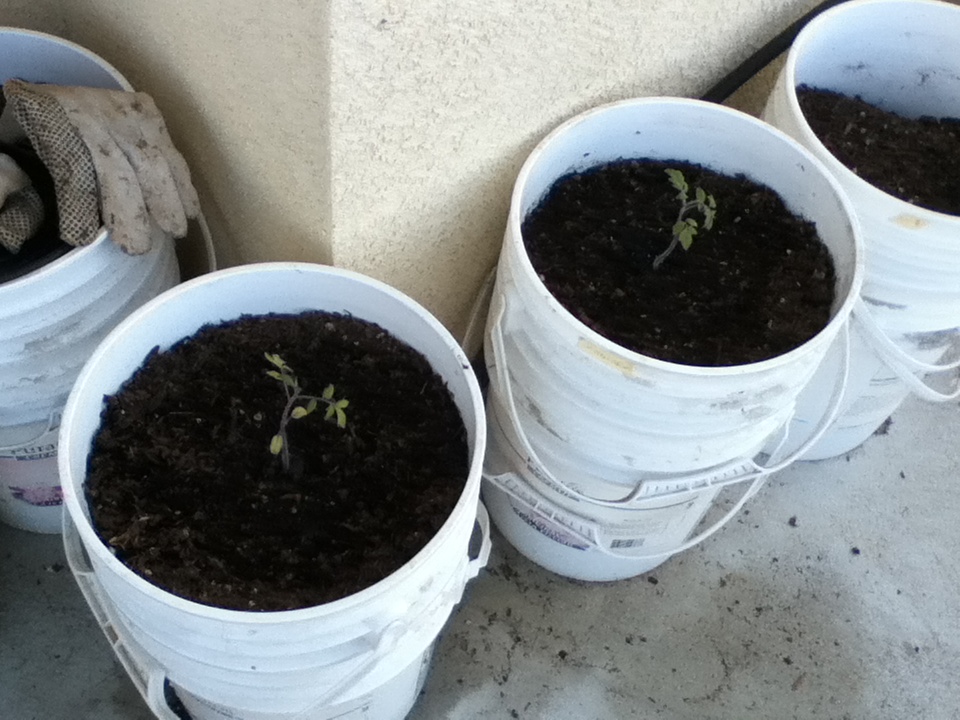 |
| These are my old self-watering buckets which I started in the fall. I have 8 of them and so far have transplanted two tomato seedlings into them for my spring/summer growing season. I think they will work great for tomatoes since tomatoes like to send down deep roots. I only have 6 inches of depth in the garden boxes whereas I have a couple feet in these buckets. I just transplanted these guys this afternoon. We'll give it a couple days and see how they do before I transplant 3 others I have going. |
 | ||
| This box is the third one when you walk out my balcony. I actually have four of these boxes for a total of 32 squares. I have more space than I know what to do with at this point but have some seedlings going in the house which will hopefully start filling up my boxes! I planted 4 sugar snap peas in the top of this square. I bought them at the farmer's market and they sat in the fridge long enough to sprout, so I thought, what the heck? We'll see what they do. Since I could have fit up to 8 of the peas in this box, I filled the other half with two Swiss chard plants I started from seed and transplanted in. |
So that's my garden so far! In the fall, I planted a very small garden in my 8 buckets...I successfully grew a small crop of broccoli, a few carrots, and TONS of lettuces which kept growing and growing as I kept clipping and clipping. I basically have 5 times the garden space now that I did then, and the weather is more-so on my side (we'll see how everything does in the harsh summer, though). I do wish I had gotten some seedlings going indoors sooner, but I didn't have my garden boxes set up until about a month ago, and before that, I wasn't sure exactly what we were going to do. So this is basically a continuation of my first year gardening. It's been great learning what works and what doesn't. I am sure as I learn and as time goes on, I will get the hang of things.
Today I just started a few more seedlings indoors. Today at the farmer's market, I bought some beautiful purple bell peppers (apparently they do come in colors other than green, red, and orange/yellow!). I am going to see if I can get a couple of those seeds to grow...and then I bought a yellow cucumber that I am also going to try to sprout. I have some squash in the fridge and will see what I can do with those seeds, too. I love using "free" seeds from veggies I buy at the farmer's market!
If you are new to gardening, I highly recommend you pick up Mel's Square Foot Gardening book (which I linked to above). He makes it so accessible and simple. I really like the concept of the boxes. Lowe's sells his "Mel's mix" which consists of 1/3 peat moss, 1/3 vermiculite, and 1/3 compost blend. It's much easier than trying to piece together the ingredients and mix them up yourself (which is an option he describes at length in his book if you can't find the Mel's mix in stores). It cost us about $100 for all of the wood for the boxes and the soil. Since you are starting with brand new soil from scratch, there's no plowing, no fertilizing, no tilling, no digging, minimal weeding, no testing, etc. This is the part that really intimidated me as a new gardener, and using square foot gardening, I don't have to worry about any of it! Mel recommends you have up to two 4 x 4 boxes per adult - one for a daily salad during the growing season, and the other for "supper veggies" during the growing season and beyond for preserving. We currently have the equivalent of two 4 x 4 boxes with the four 2 x 4 boxes my husband built, which doesn't include the 8 buckets of tomatoes I have planned. So we currently have enough room to grow over half of our produce needs with this small little balcony garden. I have room for at least a couple more 2 x 4 boxes. We own our home and have 1/5 an acre of land; however, our backyard is a construction zone at the moment, and this balcony is very easy for me to get to which means I keep things watered and maintained a lot easier. Once our backyard is done, we can easily move these boxes back there if we want to...or maybe we will build more boxes for our backyard and have even more space to grow!!
So there you have it. I will certainly keep you posted as harvest time comes!
Thursday, May 24, 2012
Good documentaries
I just watched two awesome documentaries.
Farmageddon and Fresh. Both available on Amazon instant video for a small fee. I highly recommend you check them out!
Farmageddon and Fresh. Both available on Amazon instant video for a small fee. I highly recommend you check them out!
Organic Pastures recall ended
Late news but still good news. I gladly loaded up on 2 more gallons of raw milk yesterday. We rationed our supply and fortunately never ran out! Yum, yum - praise God this was resolved quickly this time.
Thursday, May 17, 2012
Chocolate Chip Ice Cream
 |
| A big batch of my homemade chocolate chip vanilla ice cream - yum, yum yum! |
I absolutely LOVE ice cream. Growing up, I had a big bowl after dinner most nights (something I happily inherited from my mother!). Unfortunately, once we started eating "real food," commercial ice cream posed a number of problems. Many commercial ice creams contain propylene glycol (translation - antifreeze), and apparently the manufacturers do not even have to include this as an ingredient on the label because it is an "industry standard" food additive. Sarah at the Healthy Home Economist has done an excellent article on it if you wish to do some extra reading here. Another issue is that all of them use pasteurized (and most likely not grass-fed) milk/cream and refined sugars (even the organic varieties or Breyers, which is one of the better grocery store choices). These are two things I strive to avoid. And if we expand our scope to the more popular commercial offerings in the grocery store other than the more natural brands, we'll find a plethora of unpronounceable chemical additives, thickening agents, dyes, etc...
Enter homemade ice cream to the rescue! Last summer, I picked up a 1.5 quart Cusinart ice cream maker at a garage sale for $5 (much like this one). We got more than our money's worth out of this little machine...sadly, one day, the freezer bowl piece "jumped" out of the garage freezer and cracked, and we sadly had to retire the little champ. I looked into buying a replacement bowl, but I was hesitant to invest the $30 they were asking when I had no clue how old the machine was and how long before the motor part might give out. Vowing to be FAR more careful about situating the freezer bowl on stable terrain in the freezer going forward, I upgraded to this very similar 2-quart model, knowing it would earn its keep and be worth every penny after our many successes with the garage sale model. I thought I would share our favorite recipe for a basic chocolate chip vanilla ice cream. You can take the base recipe and add different things to it for different flavors, but it's just so darn good I usually stick to plain old chocolate chip!
Homemade, Chocolate Chip Vanilla Ice Cream
Serves about 6
Ingredients:
2 cups cream (preferably grass-fed and raw - I just pour the cream off our raw milk)
2 cups milk (preferably grass-fed and raw)
2 raw egg yolks (I would skip this step unless you can buy from a clean, organic, pastured source)
1/2 cup sweetener (my favorite choice is maple syrup - you could also use honey or rapadura)
2 tablespoons vanilla extract (use real vanilla extract if possible)
1/4 cup or so of chocolate chips (I found a wonderful organic, fair-trade, 72% dark chocolate bar at Trader Joe's which has NO SOY - I am in heaven! I chop part of this up and add it to our ice cream)
Directions: Combine the cream, milk, egg yolks, sweetener, and vanilla extract in a large bowl or pitcher. Whisk together with a fork. I use my immersion blender to ensure a very smooth texture. This also incorporates a lot of air into the mixture which will give your finished ice cream a much softer texture. Pour into your ice cream maker and run according to the machine's directions (about half an hour or so on the Cuisinart we use). You can add in the chocolate chips at any time, but most machines recommend adding towards the end. Once done, the ice cream will be a "soft-serve" consistency. It is delicious at this point, but if you desire, you can scoop into a shallow dish or into pint-sized jars in individual servings and freeze for an hour or so to get a firmer texture. I like to make a big batch, freeze in jars, and then we have ice cream on demand for a couple of days before we devour it all!
Here are a few more comments I have from lots of personal experience, trial and error...I don't advise putting the ice cream mixture into a blender for the pre-mixing step. I did this once, and it heated my ice cream mixture into an unpleasant custard texture. My immersion blender is great because it does not heat the mixture up - a whisk would do just fine, too, as I mentioned above. No matter what you do, homemade ice cream tends to have a more "icy" texture than commercial varieties. This is why you want to lightly scoop into individual jars or a shallow dish. Do NOT pack the ice cream down or you will eliminate the fluffiness that helps make for a smoother texture. Also - make sure your freezer bowl is VERY frozen. I usually have to leave our's in the freezer for at least 2 days for it to be fully frozen. We have a nice big freezer in the garage for storing our meats, and I make darn sure there is always enough room to keep our ice cream bowl in there so I can make ice cream whenever I want! You also want to be sure to run the machine long enough to get the ice cream as cold and frozen as possible. If your ice cream is very melty before you transfer to the freezer, it will still taste good, but it will have an icy sorbet texture to it which is edible but not desirable. I have read that adding a little vodka or rum to the ice cream also helps to make for a softer ice cream because it does not harden when it freezes. I think this really does work because I make our ice cream with my homemade vanilla extract, which is made by combining vodka and whole vanilla beans and allowing to sit for weeks, months, even years to draw out the vanilla flavoring. You are only adding 2 tablespoons for six servings - so it's not enough to cause any harm, and it has the added benefit of improving the texture of the ice cream! If your vanilla is not made with vodka or rum, you might consider adding a little to improve the texture.
As you can see, I am very enthusiastic about our homemade ice cream. When made with grass-fed raw cream/milk and such a small amount of natural sweetener like maple syrup or honey, I would honestly consider this a health food. I have justified eating it for breakfast on many occasions because I believe the raw milk, cream, and egg yolks are so nourishing! So go ahead and indulge!
Tortilla Chips
A reader (thanks again, Steve) asked what I use for tortilla chips. To be perfectly honest, for a long time, I was just buying organic corn chips from Trader Joe's. The downside is that these were always made with some type of vegetable oil, which I really strive to avoid as they are highly processed industrial food products and are not at all what I would consider a "real food" or a good fat. It's definitely a topic for another post (someday), but to give you a brief, non-scientific explanation - these oils are highly processed and rancid due to the manufacturing required to get the oil in the first place (when's the last time you squeezed a kernel of corn and out came oil?), they create free radicals in the body (in other words, they cause cancer), they are heavy in omega-6 fatty acids (most of us need more omega 3s - not more 6s), and overall they behave in a very toxic manner once inside the body. Most of us know now that sticking to butter (pardon the pun) is a much healthier choice than margarine (which is rumored to be very close to plastic on a molecular level!)...well, margarine is made of vegetable oils, if that tells you anything. These oils are something your great (great, great) grandparents had never heard of - they are a modern, industrial "frankenfood" to say the least. Avoiding them is nearly impossible unless you cook from scratch and eat real food where possible!
Now, I would love to make my own corn tortillas from scratch and deep fry them in lard or tallow or even refined coconut oil (all healthy, natural, stable fats)...but I am just not sophisticated enough to do that at this point. So my compromise, which I feel is a huge improvement from buying chips made with vegetable oil is this: I make my own restaurant-style chips using store-bought, (ideally organic) plain corn tortillas. Look closely at the ingredients - at Trader Joe's, I can find tortillas where the only ingredients are corn, water, and traces of lime. Find the best you can with the shortest, most simple ingredient list possible. I make them in the oven using olive oil, another healthy natural fat. One word of caution with olive oil - there are those who say it should never be heated because it is a very fragile oil with a low smoke point. I would agree, and I never cook over high heat on the stove with olive oil; however, I find that baking with olive oil on a limited basis is usually pretty safe and definitely healthier than consuming vegetable oil in any form. But if you really don't want to use the olive oil, you can skip it all together and just bake them plain - they will still get plenty crispy. So with all that background, below is my "recipe" for a good compromise tortilla chip. We don't eat these often, but they are definitely a treat on occasion!
Health(ier) Tortilla Chips
Ingredients:
1 package organic corn tortillas
Olive oil
Sea salt
Directions: You can make a bunch at once and store the leftovers for a couple of days, or you can make only what you are about to eat and freeze any leftover tortillas for next time. Cut tortillas into triangles. Drizzle/brush with olive oil, sprinkle generously with finely ground sea salt, and bake in the oven (or toaster oven) at about 350 degrees for about 5 - 10 minutes until desired crispiness is obtained.
Now, I would love to make my own corn tortillas from scratch and deep fry them in lard or tallow or even refined coconut oil (all healthy, natural, stable fats)...but I am just not sophisticated enough to do that at this point. So my compromise, which I feel is a huge improvement from buying chips made with vegetable oil is this: I make my own restaurant-style chips using store-bought, (ideally organic) plain corn tortillas. Look closely at the ingredients - at Trader Joe's, I can find tortillas where the only ingredients are corn, water, and traces of lime. Find the best you can with the shortest, most simple ingredient list possible. I make them in the oven using olive oil, another healthy natural fat. One word of caution with olive oil - there are those who say it should never be heated because it is a very fragile oil with a low smoke point. I would agree, and I never cook over high heat on the stove with olive oil; however, I find that baking with olive oil on a limited basis is usually pretty safe and definitely healthier than consuming vegetable oil in any form. But if you really don't want to use the olive oil, you can skip it all together and just bake them plain - they will still get plenty crispy. So with all that background, below is my "recipe" for a good compromise tortilla chip. We don't eat these often, but they are definitely a treat on occasion!
Health(ier) Tortilla Chips
Ingredients:
1 package organic corn tortillas
Olive oil
Sea salt
Directions: You can make a bunch at once and store the leftovers for a couple of days, or you can make only what you are about to eat and freeze any leftover tortillas for next time. Cut tortillas into triangles. Drizzle/brush with olive oil, sprinkle generously with finely ground sea salt, and bake in the oven (or toaster oven) at about 350 degrees for about 5 - 10 minutes until desired crispiness is obtained.
Taco Seasoning
One of my readers (thanks Steve) asked what I use for taco seasoning. Trader Joe's actually sells a descent pre-mixed envelope of taco seasoning which I've used in a pinch (all of the ingredients are pronounceable with no sign of MSG or anti-clumping agents); however, I buy organic, non-irradiated spices in bulk, and it takes only seconds to mix up a whole bunch of my homemade taco seasoning. I haven't done the math, but I am sure it's more economical as well. I use it in my chicken taco soup recipe and whenever I need to brown beef or chicken for tacos, enchiladas, etc. The below recipe makes 4 times a regular batch, which should last you several meals. I have a low tolerance for spicy foods, so you may wish to adjust and use a spicier chili powder according to your tastes.
Homemade Taco Seasoning
1/4 cup chili powder
1 tsp. garlic powder
1 tsp. onion powder
1 tsp. oregano
2 tsp. paprika
2 tblsp ground cumin
1 tblsp finely ground sea salt
1 tblsp black pepper
Just add these ingredients one by one to a small jar, stir, label, and store in your pantry with your other spices! Use to your liking in all of your Mexican dishes calling for taco seasoning.
Homemade Taco Seasoning
1/4 cup chili powder
1 tsp. garlic powder
1 tsp. onion powder
1 tsp. oregano
2 tsp. paprika
2 tblsp ground cumin
1 tblsp finely ground sea salt
1 tblsp black pepper
Just add these ingredients one by one to a small jar, stir, label, and store in your pantry with your other spices! Use to your liking in all of your Mexican dishes calling for taco seasoning.
Subscribe to:
Posts (Atom)